A MacBook Pro microphone is a built in device that captures sound allowing you to record your voice or participate in video calls. It’s a small integrated tool located near the webcam enabling communication and audio input on your MacBook Pro.
Embark on a quest to unravel the mystery: Where Is the Microphone in MacBook Pro? Dive into the heart of your device as we navigate the intricate web of technology to locate the elusive microphone, unlocking the secrets within.
The MacBook Pro has a built in microphone for audio input. It’s located near the webcam at the top of the screen. This microphone is designed for tasks like video calls voice recordings and virtual meetings. Users can easily access and configure the microphone settings through the system preferences on their MacBook Pro.
Where is the microphone on MacBook Pro 2017 and older models?
On the MacBook Pro 2017 and older models, the microphone is located near the top of the display, next to the webcam. You can find it on the left side of the camera, resembling a tiny pinhole.
This placement allows the microphone to capture audio effectively during video calls, recordings, or any other activities requiring sound input. So, if you’re looking to use the built-in microphone, it’s right there, close to the top of your MacBook Pro screen.
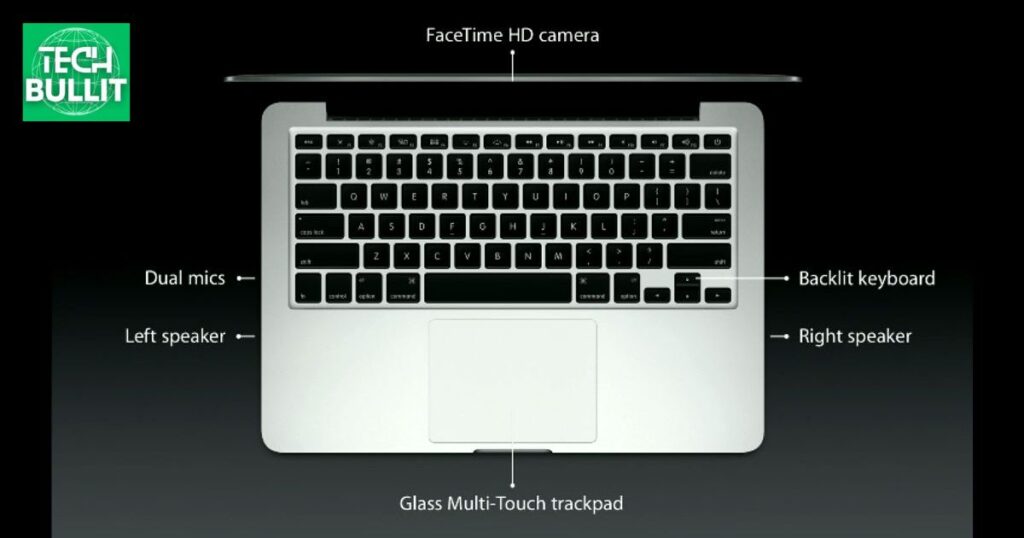
MacBook Pro 2018+ Mic Location (Apple Silicon)
The microphone on MacBook Pro 2018 and later models, including those with Apple Silicon, is located near the top of the screen. It’s positioned beside the front-facing camera, commonly known as the Face Time HD camera.
You can easily identify it as a small pinhole on the upper bezel of the MacBook Pro’s display. This microphone is designed to capture clear audio input for video calls, recordings, and other tasks.
Is the microphone on my Mac secure?
Your Mac’s microphone is designed to be secure, but it’s essential to stay vigilant. Ensure your system software is up-to-date to benefit from security enhancements. Be cautious about granting microphone access to apps, allowing only trusted ones.
Regularly check your privacy settings to confirm that your microphone is used only when necessary, enhancing your overall security.
How to reduce background noise on a Mac?
To reduce background noise on a Mac, start by checking your system preferences. Go to “Sound” and adjust the input volume to an optimal level.
Consider using an external microphone with noise cancelling features for better results. Additionally close unnecessary applications and windows to minimise background processes and improve overall audio quality.
How to check the microphone setting on Mac?
To check the microphone settings on your Mac, first, click on the Apple logo in the top left corner. Then, select “System Preferences” from the menu. In the System Preferences window, click on “Sound,” and go to the “Input” tab. Here, you can choose and adjust your microphone settings to ensure it’s working correctly.
Determine the mic’s location on a MacBook Pro
To find the microphone on a MacBook Pro, look for small pinhole openings near the top edge of the device. Common locations include near the keyboard or around the sides of the laptop.
You can also consult the user manual or check the manufacturer’s website for specific details on your MacBook Pro model. Once located, position yourself or your audio source accordingly for optimal sound capture.
Can users achieve stereo sound with the microphones on a MacBook Pro?
Users cannot achieve stereo sound with the built-in microphones on a MacBook Pro. The MacBook Pro typically has multiple microphones, but they are designed for capturing audio in mono.
For stereo sound, users would need to use external stereo microphones connected to the laptop. It’s important to check the specifications of any external microphones to ensure they support stereo recording for the desired audio quality.
How do users ensure optimal audio quality when utilizing the microphones on their MacBook Pro?
To achieve the best audio quality on your MacBook Pro, first, ensure your input or output device such as a microphone, is clean and free from dust. Adjust the input volume in System Preferences to avoid distortion or low sound.
Consider using an external microphone for higher quality audio recordings. Finally, choose a quiet environment to minimize background noise for optimal recording conditions.
How to use iMac and MacBook Pro together?
Connect your iMac and MacBook Pro using a Thunderbolt cable. Enable Target Display Mode on the iMac to use its display as an extended monitor for the MacBook Pro. You can now drag and drop files between the two devices seamlessly.
Can you connect Oculus Quest 2 to MacBook Pro?
Yes, connect your Oculus Quest 2 to a MacBook Pro using a compatible USB-C cable. Open the Oculus app on your MacBook Pro and enable Oculus Link in the settings to access and play PC VR games on your Quest 2.
Ensure your MacBook Pro meets the necessary specifications for a smooth VR experience.
Can you connect a Mac Mini to a MacBook Pro?
Yes, you can connect a Mac Mini to a MacBook Pro using a variety of methods such as Ethernet, Thunderbolt, or WiFi. Utilize a Thunderbolt or USB-C cable for a direct connection or set up file sharing through the network.
Access the Mac Mini’s files, screen, or even use it as a server, enhancing collaboration between the two devices.
What battery does my MacBook Pro use?
Your MacBook Pro uses a built-in lithium-polymer battery. The specific battery type and capacity can vary depending on the model and release year of your MacBook Pro. To find detailed information about your MacBook Pro’s battery, you can check the “System Report” under “About This Mac” in the Apple menu.
How to turn off inverted camera on MacBook Pro?
To disable the inverted camera on your MacBook Pro, open the “System Preferences” and select “Displays.” Unchecked the “Mirror Displays” option to stop mirroring and correct the camera orientation.
Alternatively, in video conferencing apps like Zoom, you can often find a “Mirror Video” or “Flip Video” option in the settings to adjust the camera view.
How to turn off Do Not Disturb on MacBook Pro?
To disable Do Not Disturb on your MacBook Pro, click on the Notification Center icon in the menu bar (top right), or swipe left with two fingers on the track pad.
Locate the “Do Not Disturb” icon (crescent moon) and click it to toggle off the feature. Alternatively, open “System Preferences” select “Notifications,” and turn off the “Do Not Disturb” option.
How to reset trackpad on MacBook Pro?
To reset the trackpad on your MacBook Pro, go to “System Preferences” and select “Trackpad.” Under the “Point & Click” tab, adjust the tracking speed to your preference and click “Apply.”
If you encounter issues, you can also try turning the trackpad off and on by unchecking and rechecking the “Enable Force Click and haptic feedback” option in the same settings.
How to remove a key on MacBook Pro?
To remove a key on your MacBook Pro, use a thin, flat tool like a plastic pry tool or a small Flathead screwdriver. Gently insert the tool under the key and lift it upward, applying even pressure. Be careful not to force it, and once lifted, clean any debris underneath.
How to fix sticky keys on MacBook Pro 2021?
To fix sticky keys on your MacBook Pro 2021, turn off the device and use a can of compressed air to blow out any debris around the sticky key. If the issue persists, dampen a cotton swab with isopropyl alcohol and carefully clean around the key.
If the problem continues, consider seeking professional assistance from an Apple Authorised Service Provider.
How to find zoom recording on MacBook?
Locate your Zoom recordings on your MacBook by opening the Zoom desktop application. Go to the “Meetings” tab, and under the “Recorded” section, you’ll find a list of your recorded meetings. Click on the meeting you want, and you can access and play the recording directly from there.
How to change picture size on MacBook Pro?
To change the picture size on your MacBook Pro, open the image using the Preview app. Click on the “Tools” menu and choose “Adjust Size.” Enter the desired dimensions or percentage, then click “OK” to resize the picture accordingly.
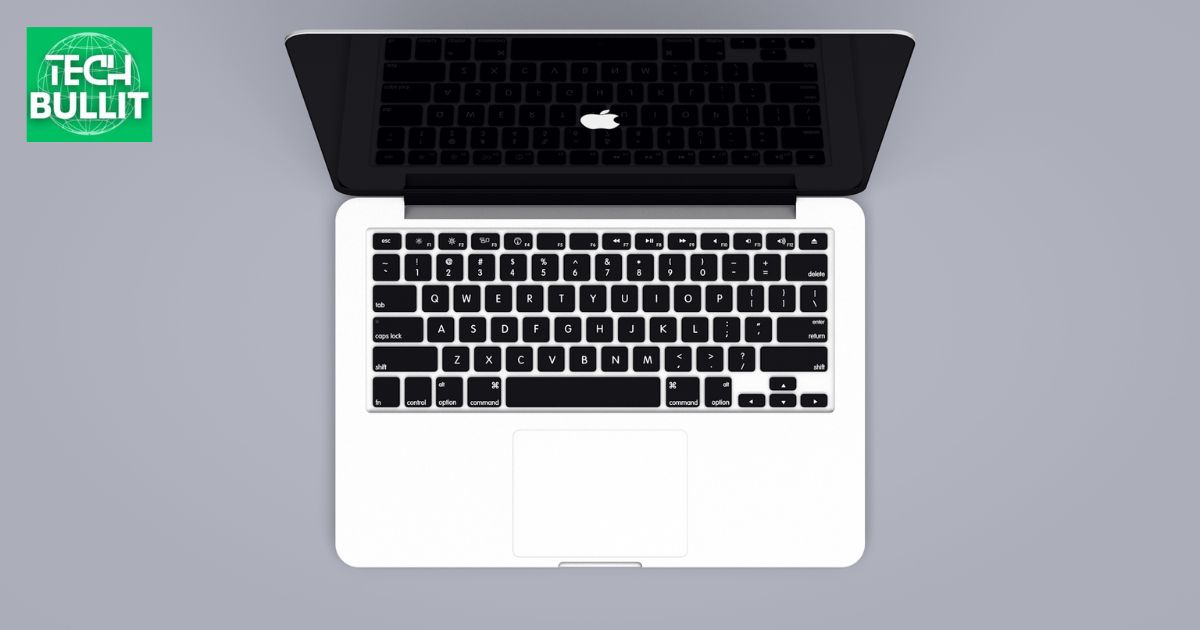
Where is the MacBook Pro Microphone?
The MacBook Pro microphone is usually located near the top of the screen, next to the camera. You can find a tiny pinhole on the left side if you’re facing the laptop. It’s designed to capture clear audio for tasks like video calls and voice recording. So, when you need to use the microphone, speak towards this area for optimal sound quality.
How to Use the Microphone on a MacBook Pro?
To use the microphone on a MacBook Pro, locate the built-in microphone near the top of the screen. Open the application or software you want to use for recording or video calls. Adjust the microphone settings in the system preferences if needed. Test the microphone by speaking into it and checking the audio levels to ensure clear sound.
Why Won’t My MacBook Pro Microphone Work?
If your MacBook Pro microphone isn’t working, check the physical connections first. Ensure that the microphone is securely plugged in. If using an external microphone, try a different USB port.
Next, check the sound settings on your MacBook Pro. Open System Preferences, go to Sound, and verify that the correct input device is selected under the Input tab.
If the issue persists, restart your MacBook Pro. Sometimes, a simple reboot can solve microphone problems. If the problem continues, it may be worth contacting Apple support for further assistance.
Faulty Sound Input Settings
If your sound input isn’t working, check your computer’s sound settings. Open System Preferences, go to Sound, and ensure the correct input device is selected. Adjust the input volume to make sure it’s not too low or muted.
Outdated Operating System
If your computer is experiencing issues, ensure that your operating system is up to date. Check for updates in the system settings and install any available updates. An outdated operating system may lack essential fixes and improvements, contributing to performance issues.
Viruses
Protect your computer from viruses by installing reliable antivirus software. Regularly update the antivirus program and perform scheduled scans to detect and remove any potential threats. Avoid downloading files from untrustworthy sources to minimise the risk of virus infections.
Dictation is disabled
If dictation is disabled on your device, go to System Preferences and select Keyboard. In the Dictation tab, ensure that dictation is turned on. If it’s already on, check your internet connection, as some dictation features require an active connection for processing.
Overloaded PRAM
If you’re facing issues, an overloaded PRAM (Parameter RAM) might be the culprit. Restart your Mac and hold down Command + Option + P + R during startup to reset the PRAM. This can resolve various system-related problems caused by excessive data in the PRAM.
Physical Damage
If your device is not functioning properly, check for physical damage. Inspect the exterior for cracks, dents, or liquid damage. Physical harm can impact the device’s performance, so seek professional assistance if you notice any visible issues.
You Haven’t Restarted Your MacBook Pro in a While
If your MacBook Pro is acting slow or experiencing issues, try restarting it. Restarting helps clear temporary system glitches and can improve overall performance. Make it a routine to restart your MacBook Pro periodically to maintain optimal functionality.
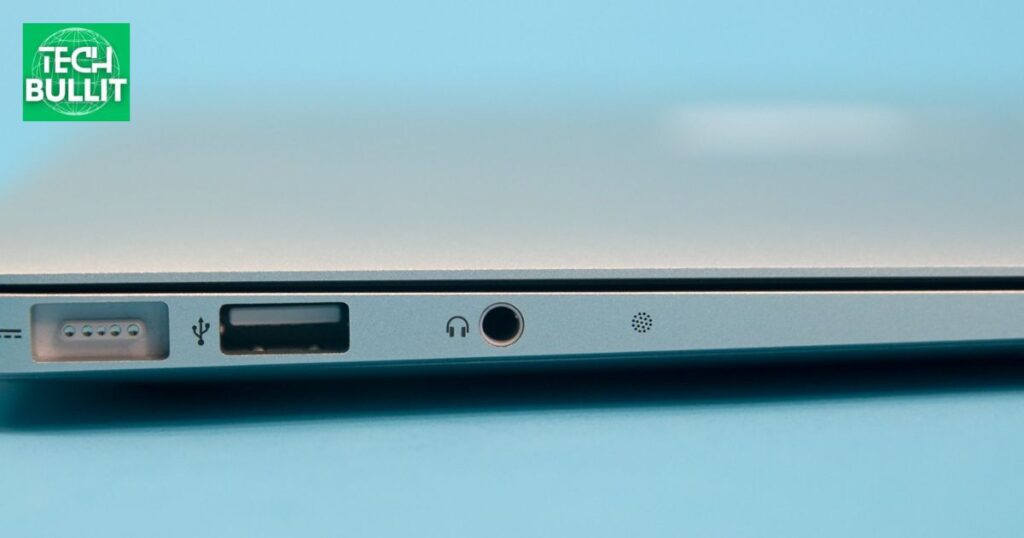
Can I Use an External Microphone With My MacBook Pro?
Yes, you can use an external microphone with your MacBook Pro. Locate the audio input port, usually found on the side of your laptop. Plug in your external microphone and ensure its securely connected.
Once connected, go to your system preferences and select the external microphone as your input source. Now, you’re ready to use your external microphone for better audio quality on your MacBook Pro.
Guided Overview MacBook Pro Model & Features
| Feature | 14-inch MacBook Pro (M3) | 14-inch MacBook Pro (M3 Pro/M3 Max) | 16-inch MacBook Pro (M3 Pro/M3 Max) |
| Display | 14.2-inch Liquid Retina XDR (3024 x 1964 pixels) | 14.2-inch Liquid Retina XDR (3024 x 1964 pixels) | 16.2-inch Liquid Retina XDR (3456 x 2234 pixels) |
| Processor | M3 chip | M3 Pro chip or M3 Max chip | M3 Pro chip or M3 Max chip |
| Memory | 8GB, 16GB, or 32GB unified memory | 16GB, 32GB, 64GB, or 128GB unified memory | 16GB, 32GB, 64GB, or 128GB unified memory |
| Storage | 512GB, 1TB, 2TB, 4TB, or 8TB SSD | 512GB, 1TB, 2TB, 4TB, or 8TB SSD | 512GB, 1TB, 2TB, 4TB, or 8TB SSD |
| Battery life | Up to 17 hours of video playback | Up to 17 hours of video playback | Up to 21 hours of video playback |
| Ports | Two Thunderbolt / USB 4 ports, MagSafe 3 port, 3.5mm headphone jack | Three Thunderbolt 4 ports, MagSafe 3 port, 3.5mm headphone jack, HDMI port | Three Thunderbolt 4 ports, MagSafe 3 port, 3.5mm headphone jack, HDMI port, SD card slot |
| Starting price | $1,599 | $1,999 | $2,499 |
How to check the Microphone settings on your MacBook Pro?
To check your MacBook Pro’s microphone settings, first, click the Apple logo in the top left corner. Then, select “System Preferences” from the drop down menu. Inside System Preferences, choose “Sound,” and go to the “Input” tab. Here, you can select and adjust your microphone settings to ensure it’s working properly.
Go To System Preferences
To access System Preferences on your MacBook Pro, click the Apple logo in the top-left corner of the screen. From the drop down menu, choose “System Preferences.” Alternatively, you can find the System Preferences icon on your Dock and click on it directly.
Select Sound Icon
Within System Preferences, locate and click on the “Sound” icon. It resembles a speaker and is usually found in the second row. Alternatively, you can use the Spotlight Search (Command + Space) and type “Sound” to directly access the Sound preferences.
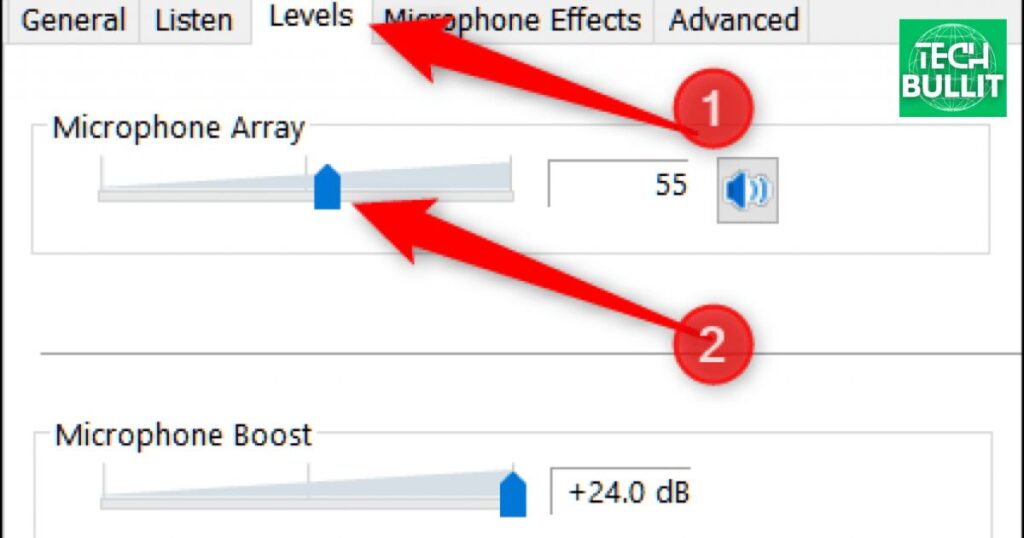
Click the Input Tab
Once in the Sound preferences, navigate to the “Input” tab by clicking on it. The Input tab is where you can manage settings related to your microphone and audio input devices. Here, you can select and adjust the settings for your MacBook Pro’s microphone.
Select the Input Device
In the Input tab, you’ll see a list of available input devices. Click on the device you want to use as your microphone. It could be the built-in microphone or an external one connected to your MacBook Pro. The selected device will be highlighted, indicating that it’s now set as the active input for your system.
Test the Microphone
After selecting the input device, speak or make a sound to test the microphone. The input level meters next to the device should respond, showing the microphone is picking up sound. Adjust the input volume slider if needed to ensure the microphone is neither too quiet nor too loud during use.
Adjust Input Levels
To fine tune your microphone’s input levels, locate the input volume slider next to the selected device. Slide it left or right to decrease or increase the input volume accordingly. Keep an eye on the input level meters as you adjust to ensure they stay within an optimal range, preventing distortion or low volume issues during audio input.
Turn On Noise Reduction
If your MacBook Pro supports it, you can enhance audio quality by turning on noise reduction. In the Sound preferences, check for a Background noise reduction or similar option within the input settings. Toggle the switch to enable noise reduction and improve the clarity of your microphone’s audio input.
Frequently Asked Questions
How do I check if my MacBook Pro has a built in microphone?
Go to “System Preferences,” select “Sound,” and check the “Input” tab for the microphone option.
Can I use an external microphone with my MacBook Pro?
You can connect an external microphone through the headphone jack or USB port for better audio quality.
Why is my MacBook Pro microphone not working during video calls?
Check the microphone settings in the video call app, ensure it’s not muted, and restart the app or your MacBook if needed.
How can I improve the audio quality on my MacBook Pro’s built in microphone?
Reduce background noise by recording in a quiet environment and adjusting microphone settings in “System Preferences” for clearer audio.
Conclusion
The microphone in a MacBook Pro is a small but powerful tool for capturing audio. Located near the webcam at the top of the screen, it allows users to communicate through video calls, record voice memos, and participate in virtual meetings.
The MacBook Pro’s built-in microphone is designed to provide clear and crisp audio quality, making it convenient for various purposes. Whether you’re making a Face Time call, recording a podcast, or attending an online class, the MacBook Pro microphone ensures that your voice is transmitted with clarity.
The integration of high-quality microphones into the MacBook Pro enhances the overall user experience, offering seamless communication and efficient audio recording capabilities. The microphone in the MacBook Pro is a valuable feature that contributes to the device’s versatility, making it a reliable tool for both professional and personal use.

Lucas Steele is an experienced professional with 10 years in education. “Teachbullit” is his domain, reflecting expertise in teaching and learning.