
A microphone is a device that converts sound waves into electrical signals. When connected to a speaker these signals are amplified and converted back into audible sound. In simple terms a microphone captures sound, and a speaker plays it back, allowing us to hear recorded or live audio.
Unlock the magic of sound with a simple connection! Dive into the world of audio brilliance by learning how to connect a microphone to a speaker. With just a few easy steps, you’ll transform any space into a sensational sound stage. Ready to amplify your voice and music? Let’s get started on this sonic adventure.
A microphone is a device that captures sound. It acts like a sensitive ear, converting sound waves into electrical signals. When connected to a speaker, these signals are amplified and reproduced as audible sound. In simple terms, the microphone picks up your voice or any sound, and the speaker makes it louder for everyone to hear. It’s a basic yet crucial setup in communication systems, allowing us to share and enjoy sound in various settings.
Connecting Microphone to a Speaker
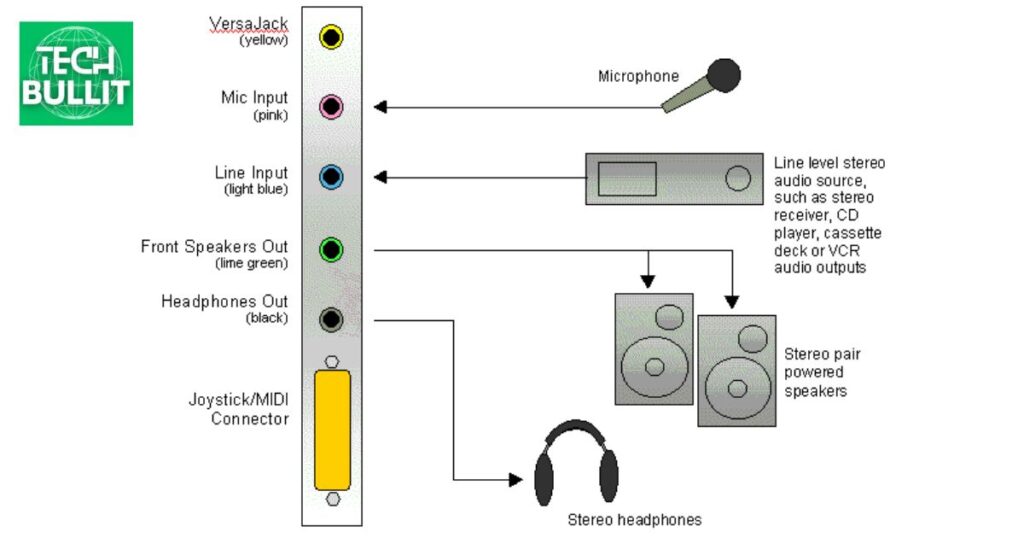
To connect a microphone to a speaker, first, locate the microphone input on the speaker. Insert one end of the microphone cable into the microphone and the other end into the designated input on the speaker. Ensure both devices are powered on, and adjust the volume settings on the microphone and speaker as needed.
Now, you’re ready to amplify your voice through the connected microphone and speaker system.
Connecting Microphone with a Built-In Amp Speaker
To connect a microphone with a built-in amp speaker, start by finding the microphone input on the speaker. Insert one end of the microphone cable into the microphone and the other end into the designated input on the speaker.
Make sure both devices are powered on. Adjust the microphone and speaker volume settings to achieve the desired sound level. Your microphone is now connected to the built-in amp speaker, ready for amplified audio.
Connecting Microphone with a Speaker with External Amplifier
To connect a microphone to a speaker with an external amplifier, locate the microphone input on the amplifier. Plug one end of the microphone cable into the microphone and the other end into the designated input on the amplifier. Connect a separate cable from the amplifier’s output to the input on the speaker.
Ensure all devices are powered on, and adjust the microphone and amplifier volumes accordingly. Now, your microphone is connected to the speaker through the external amplifier, delivering amplified sound.
How to Connect a Wired Microphone to Bluetooth Speaker?
To connect a wired microphone to a Bluetooth speaker, first, ensure your microphone has a compatible output jack. Next, use a cable with the appropriate connectors – usually an XLR to 1/8-inch or 1/4-inch jack. Connect one end to the microphone and the other to a Bluetooth transmitter with an input jack. Finally, pair the Bluetooth transmitter with your Bluetooth speaker, and you’re ready to amplify your wired microphone wirelessly.
Step-by-Step Setup
- Check Microphone Compatibility: Confirm that your wired microphone has an output jack compatible with your setup, typically XLR or 1/4-inch.
- Choose the Right Cable: Select a cable with connectors matching your microphone and a Bluetooth transmitter. Common options include XLR to 1/8-inch or 1/4-inch.
- Connect Microphone to Transmitter: Plug one end of the chosen cable into the microphone and the other end into the input jack on the Bluetooth transmitter.
- Pair Transmitter with Bluetooth Speaker: Turn on both the Bluetooth transmitter and your Bluetooth speaker. Pair them using the respective pairing buttons or through your device’s Bluetooth settings.
Now, your wired microphone is seamlessly connected to the Bluetooth speaker, providing wireless amplification for your audio needs.
How to Connect a Wireless Microphone to Wired Speaker?
To connect a wireless microphone to a wired speaker, first, ensure your wireless microphone has fresh batteries. Turn on the microphone and speaker. Locate the wireless receiver’s audio output port and connect one end of a compatible audio cable.
Then, plug the other end of the cable into the input port on the wired speaker. Adjust the volume on both the microphone and speaker to achieve the desired sound level. Now, you’re ready to enjoy wirelessly amplified sound.
Step-by-Step Setup
- Prepare Equipment: Ensure your wireless microphone has working batteries. Turn on both the wireless microphone and the wired speaker.
- Locate Receiver Port: Find the audio output port on the wireless microphone receiver.
- Connect Audio Cable: Use a compatible audio cable to connect one end to the receiver’s output port.
- Connect to Speaker: Plug the other end of the cable into the input port on the wired speaker.
- Adjust Volume: Set the desired volume levels on both the wireless microphone and the wired speaker.
- Test and Enjoy: Confirm the connection by testing the setup. Now, enjoy the convenience of a wireless microphone connected to a wired speaker.
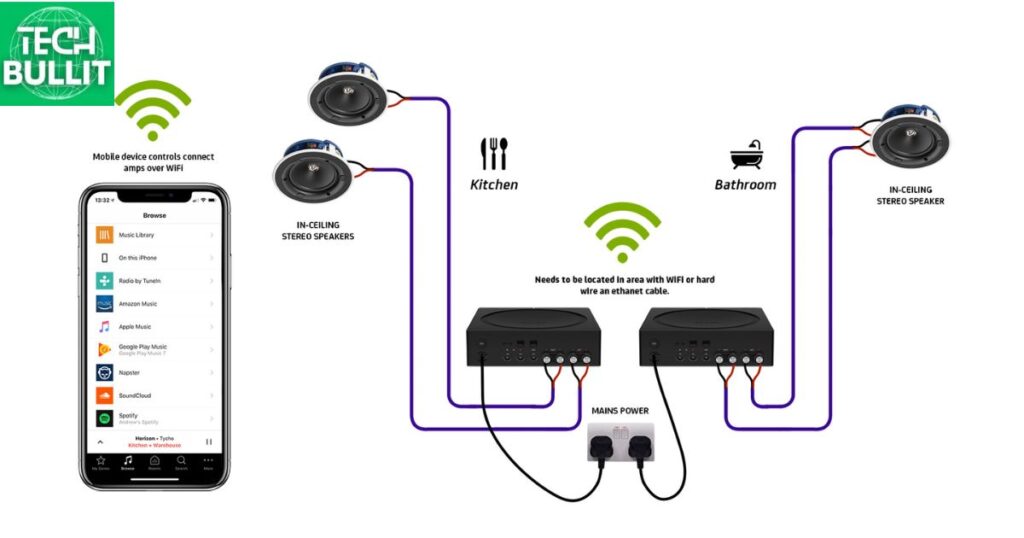
How to Connect a Wireless Microphone to Wireless Speaker?
To connect a wireless microphone to a wireless speaker, first, ensure both devices are powered on. Next, turn on the microphone and speaker, activating their wireless functions. Look for the microphone’s signal on the speaker’s available channels and select the corresponding one.
Once connected, test the setup by speaking into the microphone to ensure the sound is transmitted wirelessly to the speaker. Adjust settings as needed for optimal performance.
Step-by-Step Setup
- Power On: Start by powering on both the wireless microphone and the wireless speaker.
- Activate Wireless: Turn on the wireless features on both devices. Check for buttons or switches labeled “Wireless” or “Connect.”
- Channel Selection: On the wireless speaker, locate the channel selection option. Match this channel with the one assigned to the wireless microphone. This ensures they communicate on the same frequency.
- Testing: Speak into the microphone and verify that the sound is transmitted wirelessly to the speaker. Adjust volume levels on both devices for clear and balanced audio.
- Optimization: Fine-tune settings for optimal performance, considering factors such as range and interference. Ensure a secure and stable connection for uninterrupted audio transmission.
What speaker do you need for a microphone?

Choosing the right speaker for a microphone is crucial. Match the microphone’s impedance with the speaker’s impedance. Ensure the speaker can handle the microphone’s output power. Consider the speaker’s frequency response to capture the full range of sounds from the microphone. Compatibility between the microphone and speaker is key for clear and effective audio output.
How to Connect a Microphone to a Speaker | 3 Best Methods
To connect a microphone to a speaker, you can use three simple methods. First, use a microphone with a built-in speaker connection, ensuring compatibility. Second, utilize an audio mixer to connect the microphone and speaker for better control over sound levels. Third, employ a powered speaker with a built-in amplifier, directly connecting the microphone.
Choose the method that suits your equipment and enjoy seamless communication or music playback with your microphone and speaker setup.
How to connect a microphone to a speaker with an XLR connection
Connect a microphone to a speaker with an XLR connection by using an XLR cable. Simply plug one end of the XLR cable into the microphone and the other end into the XLR input on the speaker for a reliable and high-quality audio connection.
Steps to connect speakers with XLR mic input
Connect speakers with XLR mic input by using an XLR cable: plug one end into the microphone, and the other into the XLR input on the speaker. Ensure a secure connection for clear and professional audio output.
Some of the best Microphones with XLR connectivity
Some of the best microphones with XLR connectivity include the Shure SM7B, Audio-Technica AT2020, and the Rode NT1-A. These microphones are known for their high-quality audio capture, durability, and versatility, making them popular choices for professional and home studio recording.
How to connect a wireless microphone to a speaker
Connect a wireless microphone to a speaker by plugging the wireless receiver into the speaker’s audio input. Ensure both devices are powered on and properly paired for seamless, cable-free audio transmission.
Step-by-step process on how to connect a wireless microphone to a speaker
To connect a wireless microphone to a speaker, first, power on both the wireless microphone and the receiver. Then, pair them by following the manufacturer’s instructions, and connect the receiver’s audio output to the speaker using an appropriate cable for wireless, hassle-free audio transmission.
Some of the best microphone speaker combo set
Popular microphone and speaker combo sets include the Shure BLX288/PG58 Dual Channel Wireless Microphone System with PG58 Handheld Microphones and the Bose S1 Pro Portable Bluetooth Speaker with Sennheiser EW D1-835S Digital Wireless Microphone. These bundles provide reliable audio quality, convenience, and compatibility for various applications.
How to connect a microphone to a speaker with an audio interface?
To connect a microphone to a speaker using an audio interface, first, ensure that your microphone and speaker are compatible with the interface. Connect the microphone to the audio interface using an XLR cable, and plug the interface into your computer. Use another cable, like a quarter-inch TRS cable, to link the audio interface to the speaker.
Adjust the input and output settings on your MacBook Air and the interface, then test the setup by speaking into the microphone and checking if the sound comes through the speaker.
Steps to connect a microphone to a speaker with an audio interface
Connect the microphone to the audio interface using an XLR cable, and then link the interface to the speaker with a suitable cable (e.g., quarter-inch TRS). Adjust computer and interface settings, and test the setup by speaking into the microphone to ensure sound comes through the speaker.
Some of the best audio interfaces to connect a microphone with a speaker
Popular audio interfaces like Focusrite Scarlett 2i2 and PreSonus AudioBox USB offer reliable connections between microphones and speakers. These interfaces provide high-quality audio processing and are user-friendly for both beginners and experienced users.
Can You Plug a Microphone into a Speaker Directly?
You cannot plug a microphone directly into a speaker. Microphones and speakers have different purposes and functions. A microphone converts sound into an electrical signal, while a speaker turns electrical signals into sound. To connect a microphone to a speaker, you need an amplifier or a mixer in between.
The amplifier boosts the microphone signal, allowing it to be played through the speaker effectively. Connecting a microphone directly to a speaker won’t produce the desired results and may cause damage to the equipment.
Important Points to Remember
Here’s a table summarizing important points to remember:
| Topics | Key Points |
| Microphone to Speaker | Never plug a microphone directly into a speaker. |
| Signal Levels | Microphones produce weak signals, speakers need stronger signals. |
| Purpose Difference | Microphones capture sound, speakers reproduce sound. |
| Required Equipment | Use an amplifier or mixer to connect a microphone to a speaker. |
| Potential Issues | Connecting directly can lead to low volume, poor quality, or device damage. |
| Sound Quality | Using proper equipment ensures better sound quality and functionality. |
| Amplification | Amplifiers boost the microphone signal to a level suitable for speakers. |
| Mixer | A mixer allows adjusting and balancing multiple audio signals before reaching the speakers. |
| Equipment Compatibility | Ensure compatibility between microphone, amplifier, mixer, and speaker. |
| Safety | Incorrect connections may damage devices; follow proper setup guidelines. |
Remember these points for optimal audio setup and to avoid potential issues when working with microphones and speakers.
What kind of cable do I need?
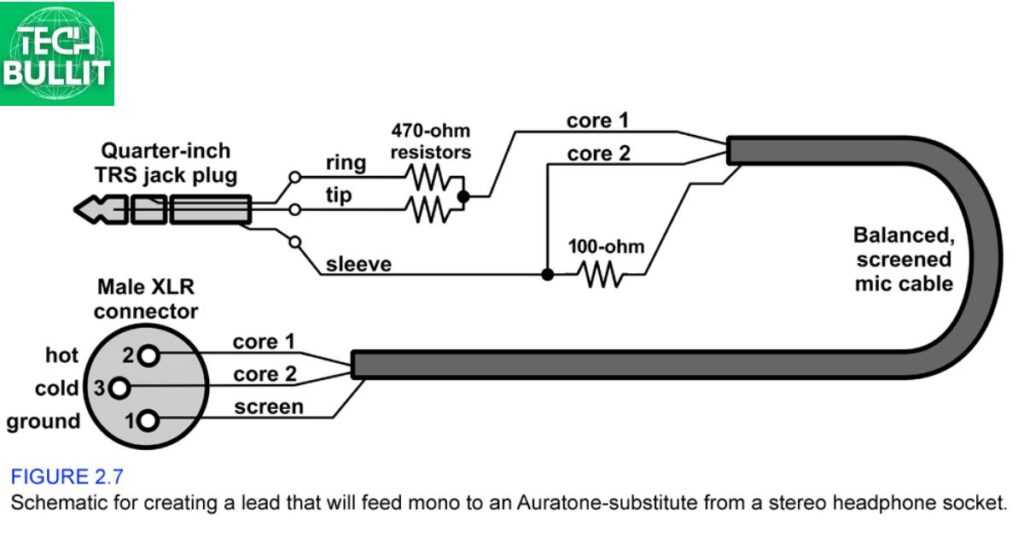
You’ll need the right cable to connect a microphone to a speaker. It’s essential to use a balanced microphone cable, commonly known as an XLR cable. This type of cable has three pins inside and is designed to carry low-level signals from the microphone to an amplifier or mixer.
Avoid using unbalanced cables or adapters, as they might result in interference or signal degradation. The XLR cable ensures a clean and balanced signal transfer, maintaining the audio quality from the microphone to the amplifier or mixer, and eventually to the speaker.
Always check the compatibility of your equipment and use the appropriate cables for a reliable and high-quality audio connection.
Speakers with an XLR Socket
Speakers with an XLR socket allow direct connection to professional audio equipment like microphones or mixers. This ensures a balanced and high-quality signal transfer for optimal sound reproduction.
Speakers with a Jack Input
Speakers with a jack input provide flexibility for connecting various audio sources, such as instruments, smartphones, or laptops. The standard 1/4-inch or 3.5mm jack allows easy compatibility, making these speakers versatile for different audio setups.
Speakers with a XLR/Jack Combo Input
Speakers equipped with an XLR/Jack combo input offer versatility by accommodating both XLR and 1/4-inch jack connectors. This dual-input capability allows users to connect a range of devices, making these speakers adaptable to various audio setups and instruments.
Microphones with a Mini-Jack Input
Microphones with a mini jack input are designed for compatibility with devices like smartphones, laptops, or portable recorders. The mini jack allows for easy connection, making these microphones suitable for on-the-go recording or live streaming setups.
Other Connectors
Apart from XLR and mini jack, microphones may also use USB connectors for direct digital connection to computers, providing convenience for recording and podcasting. Additionally some high-end microphones feature proprietary connectors or adapters for specific audio interfaces, ensuring compatibility with professional recording equipment.
What Kind of Microphone Do I Need?
Choosing the right microphone depends on your needs. If you’re recording vocals, a condenser microphone is great for capturing details. Dynamic microphones are sturdy and ideal for live performances.
USB microphones are convenient for beginners as they plug directly into your computer. Consider the polar pattern, like cardioid for solo recordings or omnidirectional for group settings. Ultimately, your choice should align with your specific use and budget.
Dynamic Microphones
Dynamic microphones are rugged and reliable, making them ideal for live performances. They excel at handling high sound pressure levels, making them suitable for amplifying loud sources like guitar amps and drums.
Condenser Microphones
Condenser microphones are excellent for recording vocals and acoustic instruments due to their sensitivity and ability to capture fine details. They require phantom power and are preferred in controlled studio environments for their high-quality audio reproduction.
How About USB Microphones?
USB microphones are user friendly directly connecting to your computer without the need for additional equipment. They’re a convenient choice for beginners and those looking for a hassle-free setup for podcasting, voiceovers, or basic recording tasks.
When Do I Need a Mixer?
A mixer is useful when you want to blend or combine ingredients smoothly. If you’re baking cakes, cookies, or bread, a mixer helps mix the batter or dough evenly. It’s handy for making fluffy pancakes or whisking eggs for omelets too.
When preparing sauces or soups a mixer ensures a consistent texture. Overall, a mixer simplifies cooking tasks, making your kitchen adventures easier and more enjoyable.
Frequently Asked Questions
How do I connect a microphone to a speaker?
Use an XLR cable to connect the microphone to the mixer and then connect the mixer to the speaker with a suitable cable.
Can I connect a USB microphone to a speaker directly?
USB microphones require a computer or audio interface use traditional microphones with XLR connections for direct speaker setup.
What if my speaker and microphone have different plug types?
Use appropriate adapters or cables to match the plug types, ensuring compatibility between the microphone and speaker connections.
Do I need a powered speaker for connecting a microphone?
A powered speaker has a built-in amplifier and is necessary for amplifying the microphone’s signal passive speakers require an external amplifier.
Conclusion
First check if your microphone and speaker have compatible connectors. If they do, find the microphone input on the speaker. It’s usually labeled as “mic in” or something similar. Insert the microphone plug into this port firmly.
Ensure the connections are secure to avoid any audio issues. Make sure Power on both the microphone and the speaker are available. Adjust the volume settings on both devices to a comfortable level. If there’s still no sound recheck the connections. Remember to use the right cables and adapters if needed.
Connecting a microphone to a speaker involves matching compatible connectors inserting the microphone into the designated port powering on both devices adjusting volumes and ensuring secure connections for clear audio output.

Lucas Steele is an experienced professional with 10 years in education. “Teachbullit” is his domain, reflecting expertise in teaching and learning.