
A microphone on an iPad is a small device that captures sound and allows you to record audio or communicate in various apps. It is built into the iPad or can be an external accessory connected through the headphone jack or lightning port. The microphone enables you to make voice call record videos.
Unlock the full potential of your iPad by mastering a crucial skill how do you turn on microphone on iPad? Discover the seamless process to activate your device’s microphone, empowering you to effortlessly capture audio make crystal-clear calls and elevate your iPad experience with just a few taps. Unleash the power of communication at your fingertips!
To turn on the microphone on your iPad locate the Settings app on the home screen. Once there tap on “Privacy” then select “Microphone.” Find the app you want to enable the microphone for and toggle the switch to the ON position. Now, your iPad is ready to capture clear audio for recording calls or other applications.
Perform iPad Microphone Test

To perform an iPad microphone test, open the Voice Memos app on your iPad. Tap the red record button and speak into the microphone. After recording, play back the audio to check for any distortions or low volume. This simple test helps ensure your iPad’s microphone is working properly for clear audio recordings and calls.
How do I test an iPad’s microphone?
To test your iPad’s microphone:
1. Open the “Voice Memos” app on your iPad.
2. Tap the red record button and speak into the microphone.
3. After recording, play back the audio to check for clarity and volume.
4. Additionally try making a voice call or using a video chat app to ensure the microphone works during real-time communication.
If you notice any issues it’s advisable to restart your iPad and check for software updates. If problems persist consider contacting Apple Support for further assistance.
Inspect Your Microphone
Make sure your microphone is clean. Check for any dust or debris on the microphone’s surface. Wipe it gently with a soft cloth. Test the microphone to ensure it’s working properly. If there are issues, consider troubleshooting or seeking professional help. Regularly inspecting your microphone helps maintain good audio quality during calls or recordings.
Check Microphone on iPad
To check your microphone on iPad, open the “Settings” app. Navigate to “Privacy” and then select “Microphone.” Ensure that the app you’re using has permission to access the microphone. Open the “Voice Memos” app and record a short audio clip to test the microphone.
Playback the recording to verify that the microphone is working properly. If any issues persist try restarting the iPad or updating the app for potential fixes.
Check for Hardware Issues
To check for hardware issues inspect your device for physical damage like cracks or loose connections. Ensure all cables and components are securely connected. Test different ports and cables to identify if the issue lies with a specific hardware element.
If problems persist consider seeking professional assistance or consulting the device’s user manual for troubleshooting tips. Regular checks help maintain the health and longevity of your hardware.
Remove Case

Removing the case from your device is simple. Look for any clasps or openings on the case. Gently pry open or unclip these sections to release the case. Be cautious not to apply too much force to avoid damaging your device.
Once the case is removed you can access ports, buttons or perform maintenance easily. Removing the case periodically also allows for better heat dissipation and prevents potential issues.
Check for Stuck Earphone Mode
If your device seems stuck in earphone mode try these steps. First unplug and replug your earphones. If the issue persists restart your device. If neither of these solutions works clean the headphone jack gently using a small brush or compressed air to remove any debris that may be triggering the stuck mode.
Do iPads have microphones?
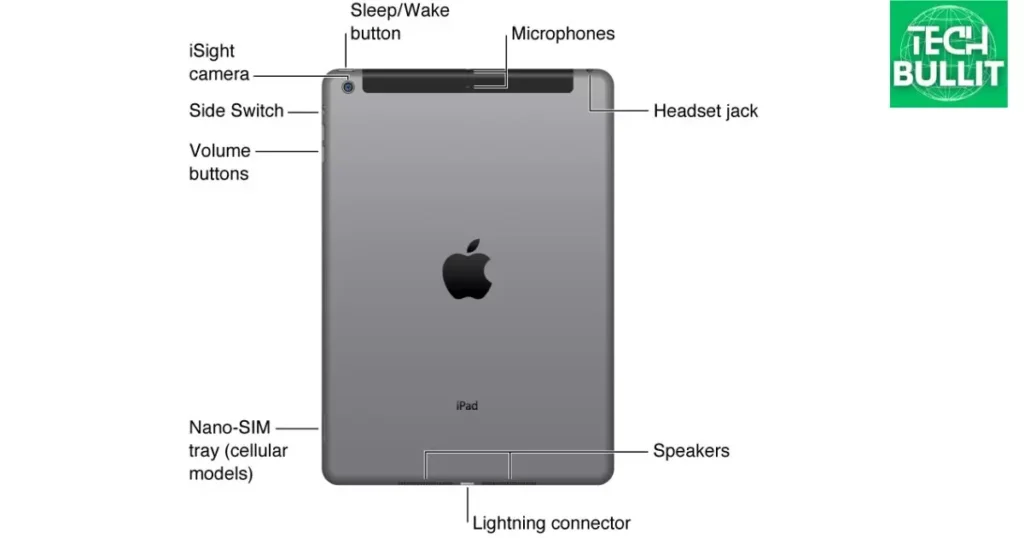
IPads have built-in microphones. These microphones are integrated into the device to capture audio for various applications such as video recording voice memos, and online calls. On the iPad 14, the microphone openings are strategically located on the sides or top of the device ensuring optimal audio capture for a seamless user experience.
Check Your Permissions
Always check the permissions granted to apps on your device to ensure privacy and security. Go to your device’s settings and find the “Privacy” or “App Permissions” section.
Review and adjust app permissions for features like camera microphone location and contacts. Regularly auditing these settings helps you control what data apps can access on your device.
Make Sure the App Has Microphone Permission
To ensure your app can access the microphone, go to your device’s settings. Look for the “Privacy” or “App Permissions” section. Find the specific app in question and verify that it has permission to access the microphone.
If not enable the microphone permission to allow the app to use this feature. Regularly checking and managing app permissions enhances your control over your device’s functionalities.
How to fix your iPad’s microphone
To fix your iPad’s microphone issues, first check if there’s any debris in the microphone or speaker openings. If the problem persists restart your iPad to refresh its system. If neither of these steps works consider updating your device’s software or seeking professional help for potential hardware issues.
Top Ways to Fix Microphone Not Working on iPad
If your iPad microphone isn’t working try these simple solutions. First check if the microphone is obstructed or covered. If it’s clear restart your iPad and test the microphone again.
Additionally make sure your apps have microphone permissions. If the issue persists update your iPad’s operating system and apps. Lastly if none of these steps work contact Apple Support for further assistance.
Remember addressing microphone issues on your iPad is often a matter of basic troubleshooting, and these steps can help you get it working again quickly.
Check Microphone on iPad

To check the microphone on your iPad open the Voice Memos app and record a short message. Playback the recording to ensure your microphone is working properly. If you encounter issues inspect the microphone for any physical obstructions or try restarting your iPad before seeking further assistance.
Disconnect Bluetooth Devices
To disconnect Bluetooth devices from your iPad, go to Settings, then Bluetooth. Find the connected device in the list and tap the “i” icon next to it. Finally, select “Forget This Device” to disconnect it from your iPad.
Make Sure the App Has Microphone Permission
To ensure an app has microphone permission on your iPad go to Settings. Scroll down and select the specific app from the list. Toggle the switch next to “Microphone” to grant permission. This step is crucial for apps to access and use your iPad’s microphone successfully.
Reset Settings
If you’re facing various issues on your iPad including microphone problems you can try resetting all settings. To do this go to Settings select “General,” then tap “Reset.” Choose “Reset All Settings” and confirm.
Keep in mind that this won’t delete your data but will reset system settings like Wi-Fi passwords and wallpaper potentially resolving any configuration related issues.
Clean iPad Microphone
To clean your iPad microphone use a small soft brush or compressed air to gently remove any debris. Avoid using liquids directly on the microphone. You can also carefully blow into the microphone opening or use a can of compressed air to dislodge any particles.
Take care not to damage the microphone and test it afterward to see if the cleaning improved its performance.
Unmute Microphone
To unmute the microphone on your iPad, check the physical mute switch on the side of the device. If it’s switched to the orange position slide it back to the non-orange side.
Additionally within apps or during calls look for the microphone icon and ensure it isn’t crossed out or muted. Adjust the settings accordingly to unmute your iPad’s microphone.
Update the Problematic App
If your iPad microphone isn’t working in a specific app consider updating the app to the latest version. Go to the App Store find the app in question, and tap on “Update” if available. App updates often include bug fixes including those related to microphone issues and can help resolve the problem.
Get iPad Out of ‘Stuck Headphone Mode
| Issue | Solution |
| 1. Check for Physical Obstructions | Inspect the headphone jack for debris or lint. Gently clean it with a small brush or compressed air. |
| 2. Restart iPad | Power off the iPad and then turn it back on. This simple step may resolve the headphone mode issue. |
| 3. Disconnect Bluetooth Devices | Ensure no Bluetooth devices are connected, as they might interfere with the headphone detection. |
| 4. Adjust Volume Settings | Increase and then decrease the volume using the physical buttons to see if the iPad recognizes changes. |
| 5. Try Different Headphones | Plug in and then unplug a different set of headphones to trigger the sensor and potentially fix the issue. |
| 6. Enable/Disable Airplane Mode | Toggle Airplane Mode on and off to reset connectivity settings, including headphone detection. |
| 7. Update iOS | Check for and install any available iOS updates, as they may contain fixes for hardware-related issues. |
| 8. Reset All Settings | Go to Settings > General > Reset > Reset All Settings. This won’t erase data but resets system configurations. |
| 9. Restore iPad | If all else fails, consider restoring your iPad to factory settings using iTunes or Finder on a computer. |
| 10. Contact Apple Support | If the problem persists, reach out to Apple Support for further assistance and potential hardware inspection. |
Update iPadOS
To update your iPadOS go to Settings tap on “General,” and select “Software Update.” If a new version is available click “Download and Install.” Follow the on-screen instructions to complete the update ensuring your iPad has the latest features and security enhancements.
Related Microphone Information
A microphone is a device that captures sound and converts it into an electrical signal. There are different types of microphones such as dynamic and condenser microphones each with its unique features.
Microphones are widely used in various applications including recording studios live performances and communication devices like smartphones and computers. Understanding the different types and characteristics of microphones is essential for choosing the right one for specific needs.
Microphone Specification
Microphone specifications include key details such as frequency response sensitivity, and polar pattern. The frequency response indicates the range of frequencies a microphone can capture influencing its tonal characteristics.
Sensitivity measures a microphone’s ability to convert sound into an electrical signal while the polar pattern defines its directional sensitivity determining where it captures sound most effectively.
Downloading Sound Recorder
To download a sound recorder visit your device’s app store (such as the Apple App Store Google Play Store or Microsoft Store) and search for “sound recorder.” Choose a reputable app with positive reviews click on the download/install button and follow the on-screen instructions. Once installed you can use the sound recorder to capture audio on your device.
Using Microphone
Using a microphone is simple. Connect it to your device’s microphone input, whether it’s a computer smartphone or audio recording device. Make sure the microphone is securely plugged in. Adjust the input levels if necessary and open your preferred recording software or app.
Speak or perform into the microphone and you’ll capture audio. To ensure good quality minimize background noise and position the microphone appropriately for your intended sound source.
List of iPad Models and Microphone Location
iPads come in various models including the iPad Air iPad Mini and iPad Pro. The microphone location on these devices may vary. Generally you can find the microphone on the top edge of the iPad near the camera or at the bottom next to the charging port.
Always check your specific iPad model’s user manual for precise information on microphone placement.
Microphone on iPad (1st generation)
The iPad 1st generation released in 2010 features a microphone located at the top edge of the device. This microphone is positioned next to the headphone jack making it convenient for capturing audio during calls recording voice memos or using various apps that require microphone input.
Microphone on iPad 2
The iPad 2 launched in 2011 has its microphone placed on the top edge of the device. You can locate it near the center just beside the headphone jack. This microphone allows users to engage in video calls record audio and use voice-related features in different applications.
Microphone on iPad (3rd generation)
The iPad 3rd generation released in 2012 features a microphone placement similar to its predecessor. The microphone is positioned on the top edge of the device near the center and next to the headphone jack.
This allows users to capture audio effectively for activities such as video calls voice recordings and other applications requiring microphone functionality.
Microphone on iPad (4th generation)
The iPad 4th generation, introduced in 2012 maintains the microphone placement found in previous models. The microphone is situated on the top edge of the device near the center and alongside the headphone jack.
These designs allows users to easily access and utilize the microphone for activities like video calls voice recordings and other applications that require audio input.
Microphone on iPad Air
The iPad Air starting from the first generation released in 2013 typically has its microphone located on the top edge of the device. Positioned near the center and close to the headphone jack the microphone on the iPad Air enables users to engage in clear audio communication during video calls record voice memos and utilize voice-related features in various applications.
Microphone on iPad Mini (1st generation)
The iPad Mini 1st generation launched in 2012 has its microphone located on the top edge of the device. Positioned near the center next to the headphone jack the microphone allows users to capture clear audio for activities such as video calls voice recordings and other applications that require microphone functionality.
Microphone on iPad Mini 2
The iPad Mini 2 released in 2013 features a microphone placed on the top edge of the device. Positioned near the center and next to the headphone jack this microphone allows users to engage in clear audio communication during video calls record voice memos and use various applications that rely on microphone input.
Microphone on iPad Mini 3
The iPad Mini 3 introduced in 2014 also has its microphone located on the top edge of the device. Positioned near the center next to the headphone jack the microphone allows users to capture audio effectively for activities such as video calls voice recordings and other applications requiring microphone functionality.
Microphone on iPad Air 2
The iPad Air 2 released in 2014 features a microphone placement similar to its predecessors. The microphone is located on the top edge of the device near the center and next to the headphone jack. This design enables users to capture clear audio for activities such as video calls voice recordings and other applications that require microphone functionality.
Microphone on iPad Mini 4
The iPad Mini 4 introduced in 2015 has its microphone located on the top edge of the device. Positioned near the center and next to the headphone jack the microphone allows users to capture clear audio for activities such as video calls voice recordings and other applications that rely on microphone input.
Microphone on iPad Pro (1st generation)
The iPad Pro 1st generation released in 2015 features multiple microphones for enhanced audio capabilities. Microphones are located on both the top and bottom edges of the device. This dual microphone setup is designed to capture high-quality audio during video recording, voice calls and other applications providing users with an immersive audio experience.
Microphone on iPad (5th generation)
The iPad 5th generation introduced in 2017 typically has its microphone located on the top edge of the device. Positioned near the center next to the headphone jack the microphone allows users to capture clear audio for activities such as video calls voice recordings, and other applications that rely on microphone input.
Microphone on iPad Pro (2nd generation)
The iPad Pro 2nd generation released in 2017 features multiple microphones for enhanced audio capabilities. Microphones are positioned on both the top and bottom edges of the device.
This dual-microphone setup is designed to capture high-quality audio during video recording voice calls and other applications providing users with an immersive and clear audio experience.
Microphone on iPad (6th generation)
The iPad 6th generation released in 2018 typically has its microphone located on the top edge of the device. Positioned near the center and next to the headphone jack the microphone allows users to capture clear audio for various activities including video calls voice recordings and applications that require microphone input.
Microphone on iPad Pro (3rd generation)
The iPad Pro 3rd generation released in 2018 features multiple microphones for advanced audio capabilities. Microphones are located on both the top and bottom edges of the device. This dual-microphone setup is designed to capture high-quality audio during video recording voice calls and other applications ensuring an immersive and clear audio experience for users.
Microphone on iPad Air (3rd generation)
The iPad Air 3rd generation introduced in 2019 typically has its microphone located on the top edge of the device. Positioned near the center and next to the headphone jack the microphone allows users to capture clear audio for activities such as video calls voice recordings and other applications that rely on microphone input.
Microphone on iPad Mini (5th generation)
The iPad Mini 5th generation released in 2019 generally has its microphone located on the top edge of the device. Positioned near the center and next to the headphone jack the microphone enables users to capture clear audio for various activities including video calls voice recordings and applications that require microphone input.
Microphone on iPad (7th generation)
The iPad 7th generation introduced in 2019 typically has its microphone located on the top edge of the device. Positioned near the center and next to the headphone jack the microphone allows users to capture clear audio for activities such as video calls voice recordings and other applications that rely on microphone input.
Microphone on iPad Pro (4th generation)
The iPad Pro 4th generation released in 2020 features multiple microphones for advanced audio capabilities. Microphones are positioned on both the top and bottom edges of the device. This dual-microphone setup is designed to capture high-quality audio during video recording voice calls and other applications providing users with an immersive and clear audio experience.
Microphone on iPad Air (4th generation)
The iPad Air 4th generation introduced in 2020 typically has its microphone located on the top edge of the device. Positioned near the center and next to the volume buttons the microphone allows users to capture clear audio for activities such as video calls voice recordings and other applications that rely on microphone input.
Microphone on iPad (8th generation)
The iPad 8th generation released in 2020 generally has its microphone located on the top edge of the device. Positioned near the center and next to the headphone jack the microphone allows users to capture clear audio for various activities including video calls voice recordings and applications that require microphone input.
Microphone on iPad Pro (5th generation)
The 5th generation iPad Pro boasts a total of five microphones! They’re strategically placed to capture your voice clearly from any direction. Two microphones are located on the top edge of the iPad, near the camera. These are the primary mics used for video calls recordings and dictation.
Three microphones are positioned on the back of the iPad, one near each speaker. These additional mics help to reduce background noise and improve audio quality in noisy environments.
Microphone on iPad (9th generation)
The 9th generation iPad has two microphones keeping things simple yet effective! One mic is located on the top edge right beside the camera perfect for clear voice capture during calls or recordings. The other microphone sits on the back of the iPad near the speaker providing additional audio pickup for better sound quality in different situations. So whether you’re chatting face-to-face or using your iPad hands-free these mics have you covered!
Microphone on iPad Mini (6th generation)
The 6th generation iPad Mini keeps things neat with one microphone strategically placed for optimal voice capture. Location: You’ll find this mic on the top edge of the iPad Mini right beside the rear camera.
This handy placement ensures clear audio for calls recordings and dictation no matter how you’re holding your Mini. So there you have it a simple yet effective setup for capturing your voice on the go!
Microphone on iPad Air (5th generation)
The 5th generation iPad Air boasts a powerful trio of microphones ensuring crystal-clear audio capture for calls recordings and dictation no matter how you hold your device. Here’s a breakdown of their locations: Two microphones are situated on the top edge, flanking the front-facing camera. These are the primary mics used for most audio tasks.
One additional microphone resides on the back of the iPad, close to the speaker on the right side. This rear mic helps suppress background noise and enhances audio quality in situations where the top mics might pick up unwanted sounds.
With this strategic mic placement, you can be confident that your voice will be heard loud and clear, whether you’re holding your iPad Air for a Face Time call recording a video or dictating a note.
Microphone on iPad Pro (6th generation)
The 6th generation iPad Pro is equipped with a powerful five-microphone array, ensuring excellent audio capture for calls recordings and dictation in any orientation. Here’s a breakdown of their locations: Two microphones are located on the top edge flanking the front-facing camera. These are the primary mics used for most audio tasks.
One microphone sits centrally on the long edge of the iPad on the opposite side of the Apple Pencil charging dock and volume buttons. This mic helps pick up audio when you’re holding the iPad in landscape mode.
Microphone on iPad (10th generation)
The 10th generation iPad keeps things simple yet effective with a single microphone for clear voice capture. This trusty mic is located on the top edge of the iPad right beside the front-facing camera.
This placement ensures your voice is heard loud and clear during calls, recordings, and dictation, no matter how you’re holding your iPad. So, whether you’re taking a video call leaving a voice note or using voice commands the 10th generation iPad has you covered with its conveniently positioned microphone.
Frequently Asked Questions
How do I turn on the microphone on my iPad?
Go to Settings then Privacy and choose Microphone. Enable the switch next to the app you want to use the microphone with.
Can I activate the iPad microphone during a call?
During a call tap the microphone icon on the screen to turn it on or off.
Where is the microphone located on my iPad?
The iPad microphone is usually located near the device’s camera, either at the top or bottom edge.
Do all apps require separate microphone permissions?
Each app needs individual microphone permissions. Adjust them in Settings under Privacy to grant access.
Conclusion
Turning on the microphone on your iPad is a simple process. First locate the Settings app on your home screen and tap on it. Within the Settings menu, scroll down and find the Privacy option. Tap on Privacy and then select Microphone. You will see a list of apps that have requested microphone access. Find the app you want to enable the microphone for and toggle the switch to the ON position.
If you’re using a specific app that requires microphone access, you can often find this option within the app’s own settings. Open the app go to its settings and look for a section related to permissions or privacy. There you should find an option to enable or disable microphone access.
Activating the microphone on your iPad is a straightforward task. Whether through the general device settings or within individual app settings, ensuring microphone access is a quick process that allows you to make the most of audio features on your iPad. Just a few taps and you’ll be ready to use your microphone for various applications and functions.

Lucas Steele is an experienced professional with 10 years in education. “Teachbullit” is his domain, reflecting expertise in teaching and learning.