The microphone on iPhone 14 is a built-in audio input device that captures sound for calls, recordings, and voice commands, enhancing the device’s communication and multimedia capabilities. It enables users to interact with their i Phones through voice and ensures clear audio quality in various applications.
Unlocking the mysteries of your iPhone 14 becomes a breeze when you ask. Where Is the Microphone On iPhone 14? Nestled discreetly within the sleek design, this integral microphone plays a silent yet powerful role in amplifying your voice during calls, recording your thoughts, and seamlessly executing voice commands. Discover the hidden gem that enhances your communication experience, tucked away in the heart of your cutting-edge iPhone 14.
The microphone on the iPhone 14 is an integral component designed for audio input. It facilitates crystal-clear voice calls, accurate voice recognition, and high-quality audio recording for a seamless user experience. Its advanced technology ensures optimal performance in diverse communication and multimedia applications.
How many microphones does an iPhone have?
An iPhone typically has multiple microphones to enhance audio quality during various activities.
These microphones serve different purposes, such as capturing your voice during calls, recording videos with clear sound, and enabling noise cancellation for improved audio clarity.
The exact number and placement of microphones may vary among different iPhone models, but they are strategically positioned to optimize audio performance in different scenarios.
Overall, the multiple microphones contribute to a better and more immersive user experience when using the iPhone for communication, multimedia, and other audio-related activities.
Where is the mic for speakerphone on iPhone?
The microphone for the speakerphone on an iPhone is typically located at the bottom of the device, near the charging port.
When using speakerphone mode, make sure the bottom of your iPhone is facing towards the conversation for optimal sound pickup.
It’s a small opening designed to capture your voice clearly during calls, providing a convenient hands-free experience. So if you’re wondering where the mic is just look towards the bottom edge of your iPhone.
Where is the mic for call on iPhone?
On an iPhone, the microphone for calls is located at the bottom of the device, near the charging port.
When making or receiving a call, ensure that the bottom of your iPhone is facing towards you for the microphone to effectively capture your voice and ensure clear communication.
This placement allows the mic to pick up your voice accurately during phone conversations.
Where is the recording microphone on an iPhone?
The recording microphone on an iPhone is typically located at the bottom of the device, near the charging port. This microphone is used for various purposes, including recording voice memos, capturing audio in videos, and enabling voice commands.
When recording, ensure that the bottom of your iPhone is facing towards the sound source for optimal audio quality, as the microphone is designed to pick up sound effectively from this position.
Where is iPhone mic?
The iPhone microphone is usually located at the bottom of the device, near the charging port. This placement allows for clear audio input during calls, recordings, and voice commands.
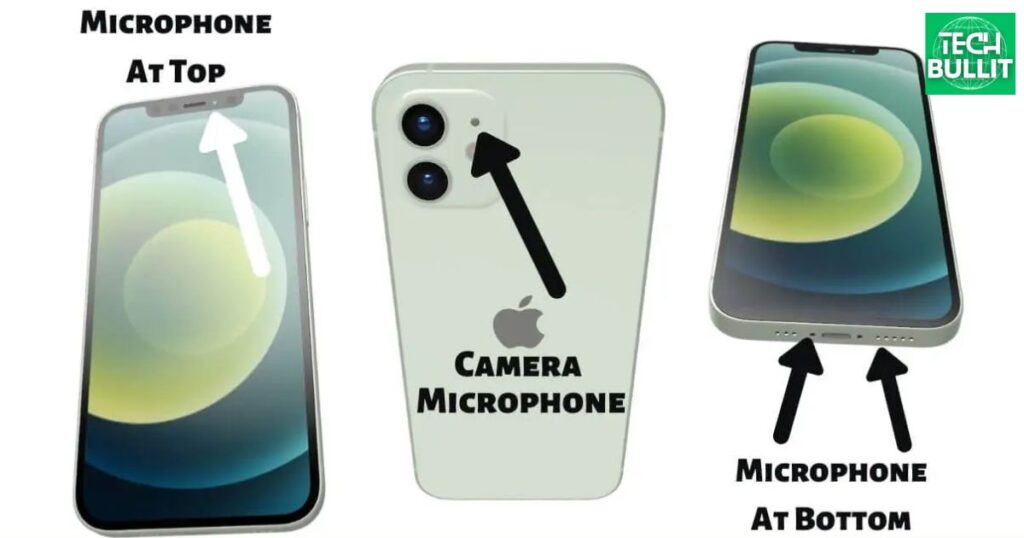
Depending on the iPhone model, there may be additional microphones on the top or back to enhance sound quality in different situations.
Overall the strategic placement of microphones ensures effective capture of audio signals for various functions on the iPhone.
Bottom mic
The bottom microphone on an iPhone is typically situated near the charging port.
This microphone is crucial for picking up your voice during phone calls, recording videos, and capturing audio in general.
Its strategic location ensures that the iPhone effectively captures and transmits clear sound when held or placed in various orientations.
Front mic
The front microphone on an iPhone is usually located near the top of the device, often near the front-facing camera.
This microphone is essential for capturing your voice during phone calls and video recordings, especially when you are speaking directly into the front of the phone.
It plays a key role in ensuring clear and crisp audio when using features like Face Time, making voice memos or engaging in video calls.
Rear mic
While iPhones typically do not have a dedicated rear microphone, some models may utilize the rear-facing camera’s built-in microphone to capture ambient audio during video recording. In such cases, the microphone is usually positioned near the camera lens on the back of the device.
This setup allows for improved audio quality by capturing sound from the environment, providing a more immersive recording experience when using the rear camera for video purposes.
Where is the microphone setting on iPhone?
To find the microphone setting on your iPhone, open the “Settings” app, scroll down, and tap on “Privacy.” Next, select “Microphone” to view and manage app permissions. Here, you can enable or disable microphone access for individual apps. Adjust the settings according to your preferences for a better audio experience on your device.
How do I check my microphone settings?
To check your microphone settings, click on the speaker icon in the taskbar. Select “Open Sound settings” and then choose “Sound control panel.” In the Recording tab, you can find your microphone and adjust its settings. Make sure it’s set as the default device for clear communication.
Where are the audio settings on an iPhone?
To find audio settings on your iPhone, tap the “Settings” app icon. Scroll down and select “Sounds & Haptic” to adjust ringtone and vibration settings.
For more detailed audio settings, go to “Accessibility” and choose “Hearing” to customize options like Sound Recognition and headphone accommodations. Explore these menus to tailor your iPhone’s audio experience.
How do I turn on my microphone on my iPhone?
To enable your iPhone microphone, find the Settings app on your home screen.
Scroll down and tap on “Privacy,” then select “Microphone.” Locate the app you want to grant microphone access to and toggle the switch next to it.
Now, your microphone is activated for that specific app on your iPhone.
How can you play a sound through the microphone on an iPhone?
To play a sound through the microphone on an iPhone 11, first, find a sound-playing app. Next, connect the iPhone to an external audio source using an adapter. Open the microphone app and start recording while playing the sound. Finally, share or broadcast the recording to have the sound played through the iPhone microphone.
How do you mute a microphone on an iPhone?
To mute a microphone on your iPhone locate the switch on the left side of the device. Slide it downward to silence incoming calls and notifications. Alternatively, during a call or recording, tap the microphone on iPhone 12 icon on the screen to mute it. To unmute, reverse these steps or tap the icon again.
How do I test my microphone on my iPhone?
To test your microphone on your iPhone, open the “Voice Memos” app and tap the red record button. Speak into the microphone, then stop the recording and play it back to listen. Alternatively, make a call or use the Voice Memos app during a call to check if your voice is clear. You can also go to Settings > Control Center > Customize Controls and add “Hearing” to access a quick microphone check feature.
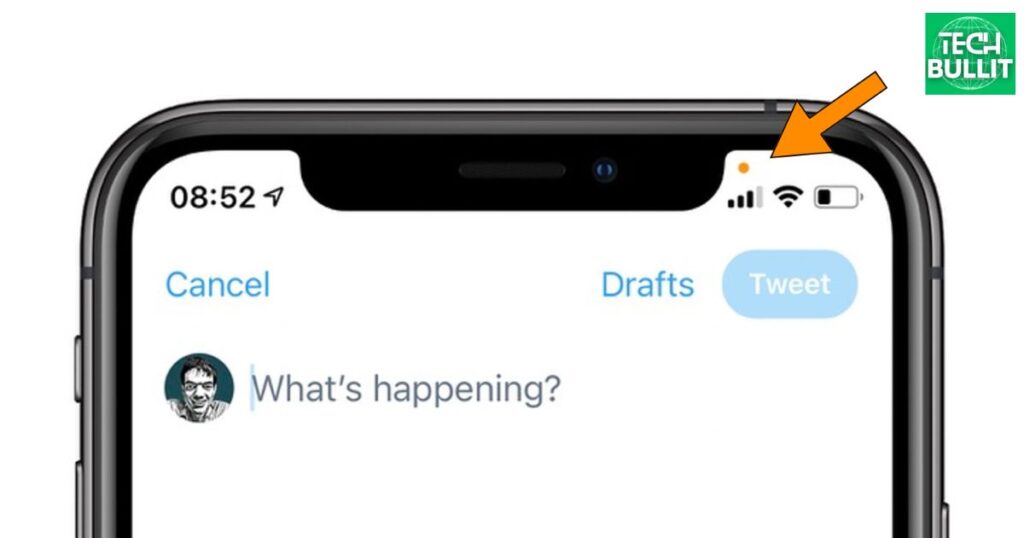
What is the blue microphone on iPhone 14?
The blue microphone on the iPhone 14 is a high-quality audio input device designed to capture clear and crisp sound. It enhances the overall audio recording experience, making it ideal for voice memos, videos, and other applications that require precise audio input.
The advanced technology behind this microphone ensures improved sound quality, contributing to a better user experience for recording and communication on the iPhone 14. Whether you’re capturing memorable moments or engaging in voice calls, the blue microphone enhances the device’s audio capabilities.
Disable Voice Control to Remove Blue Microphone from Your iPhone 14
To remove the blue microphone icon on your iPhone 14, disable Voice Control. Go to Settings, then Accessibility, and choose Voice Control. Turn it off to eliminate the microphone symbol, restoring your phone to its normal state. This simple adjustment can enhance your user experience on the iPhone 14.
What’s the black bar on top of iPhone 14?
The black bar on top of the iPhone 14 is a cutting-edge sensor array that houses advanced facial recognition technology. This feature, known as Face ID, allows users to unlock their phones and make secure transactions with just a glance.
The black bar discreetly integrates powerful sensors, ensuring a seamless and secure user experience while maintaining the sleek design of the iPhone 14.
How do I fix my microphone on my iPhone?
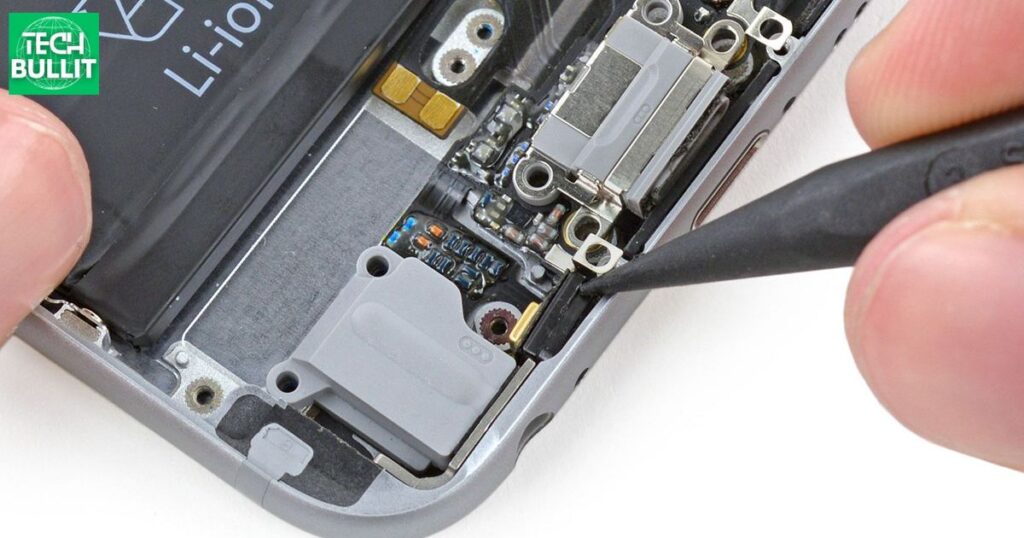
If your iPhone microphone is not working, start by checking if the device is not on mute. Ensure there are no physical obstructions like dust or debris on the microphone. If the issue persists, try restarting your iPhone or updating its software to the latest version. If these steps don’t resolve the problem, you may need to contact Apple Support for further assistance.
Why is your iPhone 14 Microphone not working?
If your iPhone 14 microphone is not working, there could be a few reasons for this issue. Firstly, check if the microphone is blocked by dirt or debris. Ensure that your device’s software is up-to-date, as outdated software can sometimes cause functionality issues.
Additionally try restarting your iPhone or resetting its settings to see if that resolves the microphone problem. If the issue persists, it may be necessary to seek professional help or visit an Apple store for further assistance.
How to Fix iPhone 14 Microphone Not Working Issue
If your iPhone 14 microphone is not working, try these simple steps to fix the issue. First, check if the microphone is not obstructed by debris or dust. Next, restart your iPhone to refresh its system. If the problem persists, ensure that your iOS is up-to-date by installing the latest software update. Lastly, if none of these steps work, consider contacting Apple Support for further assistance.
Restart your iPhone
To restart your iPhone, press and hold the power button until the slider appears on the screen. Slide the slider to turn off the device. After a few seconds, press and hold the power button again until the Apple logo appears, indicating that your iPhone is restarting.
Check for iOS Updates
To check for iOS updates on your iPhone, go to “Settings,” then tap on “General,” and select “Software Update”. If a new update is available follow the on screen instructions to download and install it. Keeping your iPhone’s operating system up to date can resolve various issues, including microphone problems.
Remove iPhone’s Case
If you’re experiencing microphone issues on your iPhone, consider removing the phone’s case. Sometimes, cases can inadvertently cover or interfere with the microphone, affecting its functionality. Removing the case may help improve microphone performance and resolve any sound-related problems you’re encountering.
Clean your iPhone’s Microphone
To enhance your iPhone’s microphone performance, gently clean the microphone openings using a soft-bristled brush or compressed air. Be cautious not to insert anything into the microphone ports, as this could cause damage. Removing dust or debris can improve sound quality and address any microphone-related issues you may be facing.
Unplug any accessories
If you’re encountering microphone problems on your iPhone, unplug any connected accessories, such as headphones or external microphones. Sometimes incompatible or faulty accessories can interfere with the iPhone’s microphone functionality.
Removing these accessories may help resolve the issue and restore normal microphone operation on your device.
Restart communication apps
If you’re facing microphone issues on your iPhone try restarting the communication apps you’re using, such as voice call or messaging apps. Close the app, swipe it away from the recent apps list, and then reopen it. This simple step can sometimes resolve software glitches and restore proper microphone functionality in communication apps.
Give apps microphone access
To ensure your iPhone’s microphone functions properly, make sure that the relevant apps have microphone access. Go to “Settings,” select “Privacy,” and then choose “Microphone.” Here, you can enable microphone access for individual apps by toggling the respective switches.
Granting the necessary permissions can resolve microphone issues and allow the apps to use the microphone for their intended purposes.
Check if your iPhone is stuck on headphone mode
If you’re facing microphone issues on your iPhone, check if it’s stuck in headphone mode. Insert and then remove headphones from the headphone jack or Lightning port a few times.
This action can help reset the headphone detection mechanism, resolving any potential software glitches causing the microphone to malfunction.
Reset All Settings
If you’ve tried various troubleshooting steps and are still experiencing microphone issues on your iPhone, consider performing a “Reset All Settings.” This will revert your device’s settings to their default configurations without affecting your data. To do this, go to “Settings,” select “General,” then “Reset,” and choose “Reset All Settings.” Keep in mind that this action will reset all system settings, including Wi-Fi passwords and wallpaper, so be prepared to reconfigure these preferences after the reset.
Get help from Apple
If your iPhone’s microphone problem persists, seek assistance from Apple support. Visit the official website or contact customer support for tailored solutions. If under warranty, they may arrange a repair or replacement.
Where Is the Microphone On iPhone 14 Step By Step Process
| Step | Instruction |
| 1 | Locate the iPhone 14 on a flat surface. |
| 2 | Identify the bottom edge of the device. |
| 3 | Look for a series of small holes on the bottom. |
| 4 | The microphone is typically near the speaker. |
| 5 | Ensure the device is in portrait orientation. |
| 6 | The microphone is on the left or right side. |
| 7 | Use a flashlight for better visibility if needed. |
| 8 | Avoid covering the holes for optimal performance. |
| 9 | The microphone placement is consistent on models. |
| 10 | Test the microphone by recording audio if unsure. |
Here’s a guide on how to clean your iPhone 14 microphone.
To clean your iPhone 14 microphone, start by turning off your device. Gently use a small, soft brush or compressed air to remove any dust or debris from the microphone openings. Avoid using liquids or harsh chemicals. Finally, turn your iPhone back on and test the microphone to ensure it’s working properly.
IPhone 14 How to Clean Microphone
To clean the iPhone 14 microphone, first, turn off the device. Gently use a small, soft brush or a can of compressed air to remove any dust or debris around the microphone area. Avoid using liquids directly on the microphone. If needed, dampen a cloth slightly and gently wipe the microphone. Be careful not to apply too much pressure to prevent damage.
Cleaning iPhone 14 Microphone Using Isopropyl Alcohol
Cleaning the iPhone 14 microphone with isopropyl alcohol can be done carefully. Turn off the device before applying any liquid. Dampen a cloth or cotton swab with a small amount of isopropyl alcohol. Gently wipe the microphone area avoiding excess liquid and applying light pressure to ensure thorough cleaning without causing damage.
Clean Mic with Microfiber Cloth or Brush, etc.
To clean the iPhone 14 microphone, use a microfiber cloth or a soft brush. Power off the device before cleaning. Gently wipe the microphone area with the microfiber cloth to remove dust and smudges. If using a brush, ensure it is soft and clean. Avoid liquids and excessive pressure to prevent damage while keeping your microphone cleans for optimal performance.
Contact Apple Support
If you encounter issues with your iPhone 14 or need assistance, contact Apple Support. You can reach them by visiting the Apple Support website or calling their customer support hotline.
Be ready with your device’s serial number and a description of the problem for efficient assistance. Apple’s support team is dedicated to helping you resolve any concerns you may have with your iPhone 14.
Factors to Be Considered for Better Sound Quality on Your iPhone

To improve sound quality on your iPhone, consider using high-quality headphones. Ensure that your audio files are in a supported format for better playback. Adjust the equalizer settings in the iPhone’s music app to enhance the audio experience. Lastly, minimize background apps and notifications to reduce interference and enjoy clearer sound.
Focus on Mic Setup
For optimal sound quality on your iPhone’s microphone, choose a quiet environment to minimize background noise. Position the microphone close to the sound source for clear and crisp recordings.
Adjust the input levels in the settings to prevent distortion or low volume issues. Additionally consider using an external microphone for professional-grade recordings on your iPhone.
Change Voice Memo Quality
To change the voice memo quality on your iPhone, open the Voice Memos app. Tap the three dots on the recording you want to adjust. Select “Quality” and choose a higher quality option for better audio. Keep in mind that higher quality recordings will take up more storage space on your device. Adjusting the quality settings allows you to balance audio clarity with storage considerations for your voice memos.
Use a Mic Windscreen
Boost your iPhone’s audio quality by adding a mic windscreen to minimize wind noise and unwanted sounds during recordings. Easily attach it to your microphone for clearer and more professional audio, especially useful for outdoor activities or interviews. Upgrade your recordings effortlessly with this simple accessory.
Get a Recording App
Improve your iPhone’s sound quality by downloading a dedicated recording app. Choose one with customizable settings for better control over audio quality. These apps often offer features like equalizers and gain adjustments, allowing you to enhance your recordings and achieve higher-quality sound effortlessly.
Frequently Asked Questions
Where is the microphone on iPhone 14?
The microphone on iPhone 14 is located at the bottom of the device, next to the charging port.
How can I find the microphone on my iPhone 14?
Look for small pinholes near the charging port at the bottom of your iPhone 14 – that’s where the microphone is.
Is there more than one microphone on the iPhone 14?
Besides the bottom microphone, there are others located on the top and rear of the iPhone 14 for various purposes like noise cancellation and video recording.
Conclusion
Locating the microphone on the iPhone 14 is a straightforward task. The primary microphone is typically situated at the bottom of the device, near the charging port. This placement ensures optimal audio capture during calls, recordings, and other audio-related functions.
Additionally, the iPhone 14 may feature secondary microphones for noise cancellation and improved audio quality. Users can also find microphones on the top or back of the device, depending on the specific model and design. Understanding the microphone’s location on the iPhone 14 is crucial for utilising its audio capabilities effectively.
Familiarising oneself with the primary and possibly secondary microphone placements enhances the overall user experience, ensuring clear and crisp audio for various activities on the device. Whether making calls, recording videos, or engaging in virtual conversations, knowing where the microphones are positioned contributes to a seamless and efficient use of the iPhone 14’s audio functionalities.

Lucas Steele is an experienced professional with 10 years in education. “Teachbullit” is his domain, reflecting expertise in teaching and learning.