Ninja is a famous streamer and gamer who plays Fortnite and other games. He uses a microphone to communicate with his audience and teammates. A microphone is a device that converts sound waves into electrical signals. The microphone that Ninja uses is the Audio-Technica AT2035123.
Curious about the stealthy world of gaming gear? Wondering, what microphone does Ninja use? Dive into the heart of the gaming universe with this burning question. Uncover the audio secrets of the gaming ninja and explore the microphone that adds a ninja’s touch to the gaming experience!
This is a high-quality microphone that filters out background noise and reduces vibration-induced noises. It also has a shock-mount and a pop-filter to improve the sound quality. The AT2035 is a condenser microphone, which means it needs a power source and an audio interface to work with a computer. Ninja uses the Creative Sound Blaster X7 preamp as his audio interface.
How Ninja Became a Famous Streamer and Gamer
Here are some easy short sentences about how Ninja became a famous streamer and gamer:
Ninja started playing video games professionally in 2009. He joined different teams and played Halo 31
Ninja began streaming his games online in 2011. He tried different games like H1Z1 and PUBG.
Ninja switched to Fortnite in 2017. He realized that the game was very popular and fun. He changed his style to be more family-friendly.
Ninja gained a lot of followers and subscribers on Twitch. He broke many records and became the most-followed streamer.
Ninja collaborated with famous celebrities like Drake, Travis Scott, and Marshmello. He attracted more viewers and fans.
Ninja got many brand deals and sponsorship, making him a global gaming icon. In 2024, he further solidified his status by venturing into the world of professional streaming with the Best Wireless Microphones In 2024, showcasing his commitment to top-notch gaming equipment.
Additionally, Ninja even secured his own skin in Fortnite, marking a significant milestone in his illustrious gaming career.
The Benefits of Using a High-Quality Microphone for Streaming
Using a high-quality microphone for streaming can have many benefits for your audio quality, your audience’s experience, and your professional image. Here are some of the benefits of using a high-quality microphone for streaming:
A high-quality microphone can capture your voice more accurately and clearly, reducing distortion, noise, and feedback. This can make your voice sound more natural, expressive, and engaging to your listeners.
A high-quality microphone can also filter out unwanted background sounds, such as keyboard clicks, fan noises, or ambient noises. This can make your stream more focused and immersive, and avoid distracting or annoying your audience.
A high-quality microphone can offer more options and features, such as different polar patterns, gain control, mute button, headphone jack, and RGB lighting. These can help you adjust your microphone to suit your streaming needs and preferences, and also enhance the aesthetic of your setup.
A high-quality microphone can improve your streaming quality and reputation, as it shows that you care about your audio and your audience. It can also help you stand out from other streamers who use low-quality microphones, and attract more viewers and followers.
The Features and Specifications of the Audio-Technica AT2035 Microphone
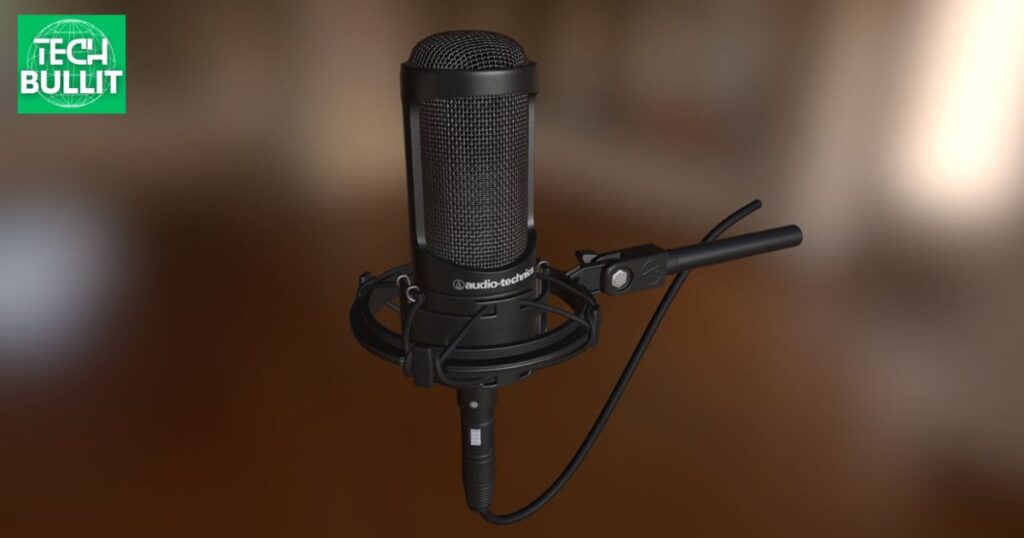
The Audio-Technica AT2035 is a cardioid condenser microphone that is designed for studio and live applications. It has the following features and specifications:
It has a large diaphragm that delivers exceptional detail and low noise.
It has a switchable 80 Hz high-pass filter and 10 dB pads that allow it to handle high sound pressure levels with ease.
It has a custom shock mount and a pop filter that improves the sound quality and reduces vibration and plosive noises.
It has a frequency response of 20-20,000 Hz and a sensitivity of -33 dB (22.4 mV) re 1V at 1 Pa.
It has an impedance of 120 Ohms and a dynamic range of 136 dB.
It has an XLR output connector and requires phantom power of 11-52V DC, 3.8 mA typical.
It weighs 403 g (14.2 oz) and measures 170.0 mm (6.69″) long and 52.0 mm (2.05″) maximum body diameter.
It comes with a protective pouch and a 5/8″-27 to 3/8″-16 threaded adapter.
How to Set Up and Connect the Audio-Technica AT2035 Microphone to Your Computer
I see that you are interested in learning how to set up and connect the Audio-Technica AT2035 microphone to your computer. This is a great microphone for streaming, podcasting, and recording. Here are the steps to follow:
First, you need to attach the microphone to a stand or a boom arm using the included shock mount. The microphone should be positioned in front of your mouth, about 6 inches away.
Second, you need to connect the microphone to an audio interface using an XLR cable. The audio interface is a device that converts the analog signal from the microphone to a digital signal that the computer can process.
You can use any audio interface that has a microphone input and phantom power, such as the Creative Sound Blaster X7 that Ninja uses.
Third, you need to connect the audio interface to your computer using a USB cable. The audio interface should be recognized by your computer as an external sound card. You may need to install drivers or software for the audio interface to work properly.
Fourth, you need to configure the settings and preferences of the microphone and the audio interface. You can use the knobs and buttons on the audio interface to adjust the gain, volume, and other parameters.
You can also use the software on your computer to select the audio interface as the input and output device, and to change the sample rate, bit depth, and other options.
Fifth, you need to test the microphone and the audio quality. You can use recording software or streaming software to record or stream your voice. You can also use headphones to monitor your sound and make adjustments as needed.
The Creative Sound Blaster X7 Preamp
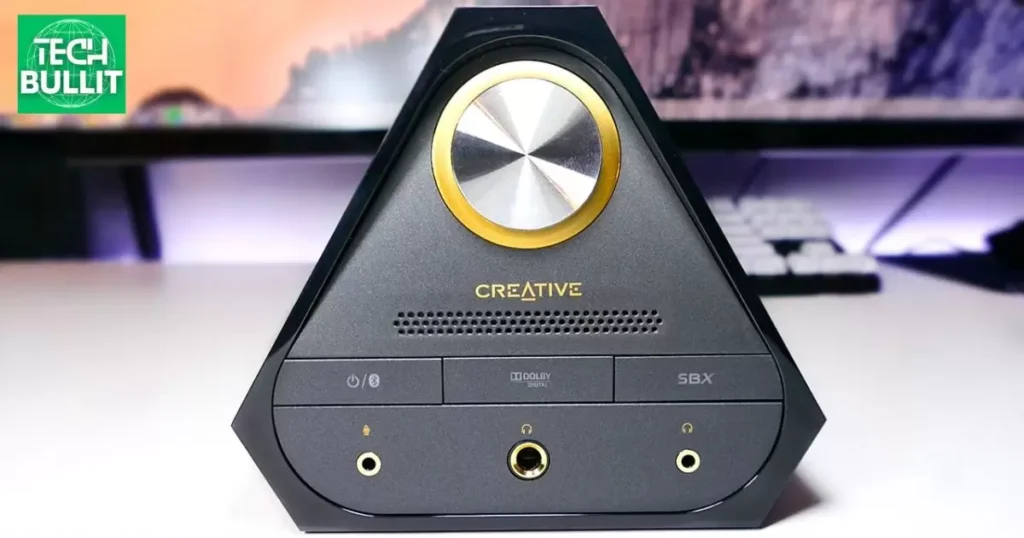
The Creative Sound Blaster X7 Preamp is a device that acts as an external USB DAC and a powerful audio amplifier for your PC, console, or mobile device. It supports high-resolution audio formats, Bluetooth connectivity, Dolby Digital decoding, and various sound enhancement technologies. It also has a built-in microphone and a range of inputs and outputs for different audio sources and speakers. It is designed to deliver the best audio experience for gamers and audiophiles alike.
Some of the features of the Creative Sound Blaster X7 Preamp are:
- 24-bit/192kHz DAC that supports PCM and DSD playback
- 100W stereo amplifier (with optional power adapter) that can drive speakers with impedance as low as 4 ohms
- Bluetooth 4.1 with aptX Low Latency and AAC codec support for wireless streaming
- Optical input and output for digital audio devices
- USB host port for iOS and Android devices
- RCA stereo input and output for analog audio devices
- 3.5mm headphone output with dedicated volume control
- 6.3mm headphone output with 600 ohm amplifier
- 5.1 channel line output for surround sound speakers
- Microphone input with crystal Voice technology
- Dolby Digital decoder that converts 5.1 channel audio from optical input to analog output
- SB-Axx1 multi-core processor that enables various sound processing features such as SBX Pro Studio, Scout Mode, Crystal Voice, and Smart Volume
- Sound Blaster X7 Control app that lets you customize your audio settings and preferences
How to Adjust the Settings and Preferences of the Audio-Technica AT2035 Microphone?
The Audio-Technica AT2035 Microphone is a large-diaphragm condenser microphone that delivers exceptional sound quality for various applications, such as home recording, podcasting, streaming, and voice-over. It has a cardioid polar pattern that reduces pickup of sounds from the sides and rear, improving isolation of the desired sound source
To adjust the settings and preferences of the Audio-Technica AT2035 Microphone, you will need the following:
- A microphone stand or boom arm that can support the weight and size of the microphone and its shock mount
- A microphone cable with a male XLR connector at one end and a compatible connector at the other end, depending on your audio interface or mixer
- An audio interface or mixer that can provide 11-52V DC phantom power and has a microphone input with a female XLR connector
- A computer or mobile device with a compatible audio software or app that can record or stream your audio
The steps to set up and adjust the microphone are as follows:
- Attach the microphone to the shock mount by inserting it from the proper direction and aligning the slot ring on the shock mount with the microphone. The front of the microphone is identified by the Audio-Technica logo. The back of the microphone has a label that says “Back”.
- Attach the shock mount to the microphone stand or boom arm by threading it onto the stand adapter. You may need to insert the included 5/8″-27 thread adapter into the shock mount before connecting it to the stand or boom arm.
- Connect the microphone cable to the microphone’s XLR output and to the audio interface or mixer’s XLR input. Make sure the cable is securely plugged in and not twisted or tangled.
- Turn on the phantom power switch on the audio interface or mixer. The microphone requires 11-52V DC phantom power to operate.
- Adjust the gain or level knob on the audio interface or mixer until you get a clear and strong signal from the microphone. You may need to use headphones or speakers to monitor the sound.
- Open the audio software or app on your computer or mobile device and select the audio interface or mixer as the input device. You may need to adjust the settings or preferences of the software or app to optimize the audio quality and performance.
- Start recording or streaming your audio using the microphone.
The Pros and Cons of the Audio-Technica AT2035 Microphone
The Audio-Technica AT2035 Microphone is a popular choice for recording acoustic guitar, vocals, and other instruments. It has a large-diaphragm condenser design that delivers clear and detailed sound quality.
However, like any microphone, it also has some advantages and disadvantages that you should consider before buying it. Here are some of the pros and cons of the Audio-Technica AT2035 Microphone:
Pros:
It has a wide frequency range and a flat response, which means it can capture the natural sound of your source without coloring or distorting it.
It has a high noise tolerance, which means it can handle loud sound sources without clipping or overloading. It also has a -10 dB pad and a low-end filter switch that allow you to adjust the microphone’s sensitivity and frequency response according to your needs.
It is well-built and durable, with a metal body and a shock mount that reduce vibrations and handling noise. It also comes with a protective pouch and a windscreen that protect the microphone from dust and moisture.
It is affordable and offers good value for money, compared to some of its competitors in the same price range. It is suitable for both home and professional use, and can be used with various audio interfaces and mixers that provide phantom power.
Cons:
It is heavy and bulky, which may make it difficult to position and transport. It also requires a sturdy stand or boom arm that can support its weight and size.
It has only one polar pattern, which is cardioid. This means it picks up sound mainly from the front and rejects sound from the sides and rear. This can be useful for isolating your sound source, but it also limits your options for recording different sounds and effects.
Some other microphones offer multiple polar patterns, such as omnidirectional, bidirectional, or super cardioid, that give you more flexibility and versatility.
It does not have a USB connection, which means you cannot plug it directly into your computer or mobile device. You need an audio interface or mixer that can provide phantom power and has an XLR input.
This may add to the cost and complexity of your setup, especially if you are a beginner or have a limited budget.
The Reviews and Ratings of the Audio-Technica AT2035 Microphone
| Source | Rating | Summary |
| Music Radar | 4.5/5 stars | A reliable home studio workhorse that offers superb value, easy use, and suitable for vocals and instruments. |
| Sound On Sound | N/A | A sizable improvement on the AT2020, with lower self-noise and a tolerance for high SPLs. It also comes with a custom shock-mount and a padded pouch. |
| Sweetwater | 4.7/5 stars | A great mic for the money that is very sensitive, has a warmer sound than expected, and comes with a shock mount. |
| Produce Like A Pro | N/A | A versatile and affordable mic that delivers clear and detailed sound quality for various applications. |
| Audio Apartment | 4.8/5 stars | One of the best budget microphones that is far more responsive than anticipated, sounds warmer than anticipated, and includes a shock mount. |
Frequently Asked Questions
What is the name and model of the microphone that Ninja uses?
Ninja uses the Electro Voice RE-20 Cardioid Microphone.
What are the features and benefits of the microphone that Ninja uses?
The microphone that Ninja uses has high-quality sound, filters out background noise, reduces vibration-induced noises, and has a blast and wind filter.
How much does the microphone that Ninja uses cost?
The microphone that Ninja uses costs around $450, depending on the seller and the availability.
How does Ninja connect the microphone to his PC or console?
Ninja connects the microphone to his PC or console using an XLR cable and an audio interface or mixer that provides phantom power.
What are some alternatives or competitors to the microphone that Ninja uses?
Some alternatives or competitors to the microphone that Ninja uses are the Shure SM7B, the Rode Podcaster, and the Audio-Technica AT2020.
Conclusion
The microphone that Ninja uses is the Electro Voice RE-20 Cardioid Microphone. This is a high-quality XLR microphone that filters out background noise and reduces vibration-induced noises.
It also has a blast and wind filter that covers every opening and a frequency response of 45Hz-18 kHz. The microphone delivers clear and detailed sound quality for streaming and communication.
However, the microphone also has some drawbacks, such as its high price, its heavy and bulky size, and its need for an audio interface or mixer that provides phantom power. Therefore, the microphone may not be suitable for everyone, especially beginners or those with a limited budget.
Some alternatives or competitors to the microphone are the Shure SM7B, the Rode Podcaster, and the Audio-Technica AT2020. These microphones have different features and benefits that may appeal to different users and preferences.

Lucas Steele is an experienced professional with 10 years in education. “Teachbullit” is his domain, reflecting expertise in teaching and learning.